
The main images on these two cards were made using the cold laminate sheets you get at office supply stores. They are thicker than acetate and sticky on one side. Every time I try to stamp onto acetate or laminate I cannot get a good image or it rubs off, so for this one I did things a bit different. Stamp on the sticky side! (That is why the script in the purple card�s image is backwards!) I also used something that I have not used in some time to color the images with (on the sticky side again) which are Metallic Rub Ons and Mica Powders.
Supplies used for this project:
Cut two pieces of cold laminate plastic roughly 4� square. This gives you some room to work with around the images as they are not this large. Peel off the paper backing of one piece of laminate and place it sticky-side up on your table. Stamp the Lady with Script image onto the sticky side of the laminate with India Ink Black permanent ink. Let the ink dry by itself or heat it slightly from a few inches away with your heat gun.
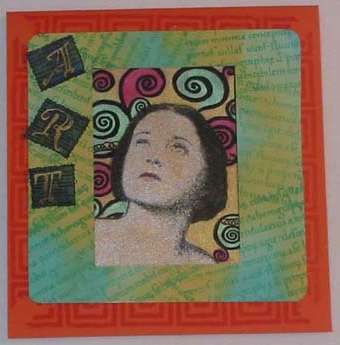
For the second card, cut the same sized two pieces of laminate and place one sticky side up on your table. Stamp the Lady with Scrolls image with India Ink Black ink on the sticky side. Color in the face and hair same as directed above with the same colors. For the background, I used Crimson Red Gold and Jade Pearl Moon Glow powders for the scrolls, and Glimmering Gold Dust for the entire back of the image. (The Moon Glow colors area bit brighter so they show up better). Cover this with the second laminate sheet.
Cold Laminate Cards By Sharon 'Harry' Solly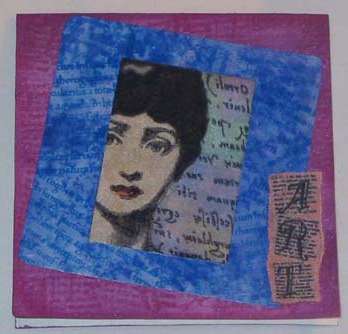
To color the image, apply the Golden White metallic rub on with either your finger or a paintbrush to the face area. Color the hair area with Midnight Sparkle. Add a slight tint of Russet to the lips.
To color the background area around the image, gently apply Duo Red-Blue, Duo Green-Yellow and Duo Blue-Green Pearl Ex powders with a fluffy paintbrush. Once you have those all colored in, go over the entire back of the image with Brilliant Gold Pearl Ex powder. The powder will stick to the metallic rub on and help the image appear more solid.
Remove the paper backing from the second piece of laminate and place it onto the back of the stamped and colored piece. Rub it gently to make sure there are no bubbles.
Stamp the Large Photo Mount frame image onto the back of the Blue marbled paper with black ink. Cut out the frame, using a craft knife for the inside area. Stamp the Script image repeatedly over the front of the frame using Blue Memories permanent ink. Trim the laminate image to fit inside the frame and glue it in place.
Cut a piece of watercolor paper to roughly 8 �� x 4 1/8� and color it with Cranberry Twinkling H2O watercolor paint. Allow the paper to dry or heat dry it with your heat gun (the latter will cause it to wrinkle somewhat, but you can weight it down under a book to straighten it back out). Fold the paper in half to create a card.
Color the sanded shrink plastic with the Aurora Brilliance pigment inkpad. Let it sit for a few minutes so it can dry somewhat. Stamp the ART word image onto the colored shrink plastic with Graphite Black Brilliance pigment ink. Cut out the image with Deckle edged scissors. Shrink the image with your heat gun.
Glue the framed image onto the front of the card at an angle and the shrink plastic doodad to the lower right corner as shown. I used Gel Medium for the shrink plastic as I wanted it to stick well.
Stamp the Large Photo Mount Frame image onto the back of the Green/Yellow marbled glossy cardstock with black ink. Cut the frame out. Stamp the Script image repeatedly over the front of the frame with Gamma Green Brilliance pigment ink. Heat set the ink till dry.
Color a piece of sanded shrink plastic with Blue and Yellow decorator chalks. Stamp the ART word image with Graphite Black Brilliance pigment ink. Cut each letter out as shown with deckle edged scissors and shrink with your heat gun. The chalk was darker than I had wanted after the piece was shrunk, and the letters were hard to see, so I painted them with Metallic Gold acrylic paint.
Cut the orange cardstock roughly 8 ��x 4 1/8� and fold in half. Stamp the Square Border image four times on the front of the folded card as shown with Vermilion dye ink. Glue the framed image and the shrink art words to the front as shown.